As teleworking takes hold around the world, enterprise organizations are turning to online collaboration tools like Microsoft Teams to broadcast Live Video communications. Although the platform is intuitive and easy to use, adopting new technologies is never easy, and learning to scale Live Video to a remote workforce is no exception.
In a recent webinar, we were joined by Steve Smith, Instructor and Microsoft Regional Director at Combined Knowledge, who walked us through how to prepare for your first Microsoft Teams Live Event. Here’s an overview of what he shared.
Tips for Setting Up Teams for Live Events
Before your organization can start broadcasting Live Video to hundreds or even thousands of employees, it’s important to prepare your system for the event. Network readiness is the first thing you need to consider. A lot of companies don’t put much thought in this; they just push the button and start sharing. While this isn’t a concern for one-to-one or one-to-few video calls, it can result in event failure for large-scale communications.
Secondly, you need to ensure you have the right licenses in place to broadcast the event to a wide audience. Remember, there are a variety of roles involved in Live Event production: producers, presenters, attendees and, depending on the event, third-party vendors streaming the event through an external app. You will need:
- An Office 365 Enterprise E1, E3, or E5 license or an Office 365 A3 or A5 license
- A Microsoft Teams license
- A Microsoft Stream license
The User preparing the meeting must also have the following settings enabled:
- Private meeting scheduling in Teams enabled (The TeamsMeetingPolicy -AllowPrivateMeetingScheduling parameter = True)
- Video sharing enabled in Teams meetings (The TeamsMeetingPolicy -AllowIPVideo parameter = True)
- Screen sharing enabled in Teams meetings (The TeamsMeetingPolicy -ScreenSharingMode parameter = EntireScreen)
- Live event scheduling in Teams enabled (The TeamsMeetingBroadcastPolicy -AllowBroadcastScheduling parameter = True)
- Permissions to create live events in Stream (for external app or device production)
Be aware that a non-authenticated user cannot be a producer or presenter in Teams Live Events.
Live Events Capacity Planning
When planning a Live Event in Teams, you also need to be aware of the platform’s capacity. For events produced in Teams:
- Maximum audience size: 100,000 attendees through July 1 (Shout out to Microsoft for increasing the limit from 10,000 attendees to support enterprises impacted by COVID-19!)
- Maximum Live Event duration: 4 hours
- Maximum number of concurrent Live Events per O365 tenant: 15
Events produced outside of teams, by Skype for example, will have similar capacities, but not all features transfer over between the two. This document from Microsoft breaks it down.
Configure Teams Admin Settings

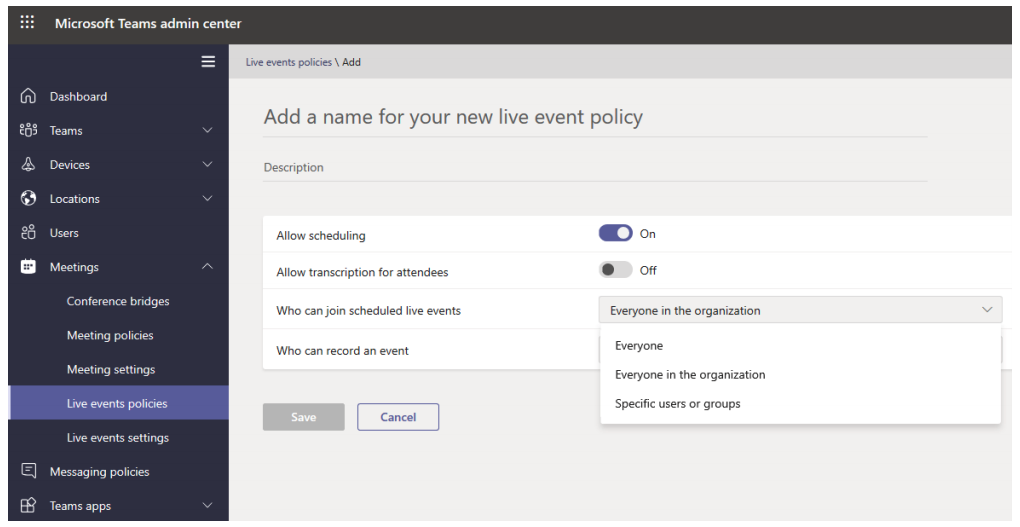
From a configuration perspective, you need to make sure you’ve enabled the Live Event options. To do this, go into your Microsoft 365 tenant administration and open the Teams admin center. Here you can enable event scheduling, who can join, and who can record.
Manage Events Through PowerShell
For those who are IT savvy and like to manage events through PowerShell, there is a module for Teams that has all the settings for Live Events enabled. In the PowerShell tool, simply install the Microsoft Teams module which will allow you to control the same settings as the Microsoft Teams admin center. You can also perform management tasks during the meeting like reviewing the number of attendees or pulling reports in PowerShell as well.
Create a Live Event in TeamS
Now that Live Events are enabled in Teams, it’s time to create your first event. To do so, open the meetings app in Teams as you would when scheduling a standard meeting. A drop-down should populate with the option to create a new Live Event. Whoever creates the event is the default organizer/producer, and it is their responsibility to invite other presenters to the meeting.
Configure Live Event Options
The next step is inviting attendees to join your meeting. First, decide who you want to target your event to. Is it for everyone in the organization, the public, or do you want to limit the scope to a specific audience? (The options you see are predetermined by the settings applied in the tenant app.)
At this stage, you can also set a recording default. If you choose the option to make the recording available to attendees, it will be saved to Stream and be available on demand for those who either could not attend or would like to view the recording later.
Publish the Event
When you are ready to publish the event, a link will be sent to you. This is the attendee link and it can be shared on any channel to drive traffic to your Live Event. The producer is then responsible for starting the event and recording it.
Learn More about Live Events in Microsoft Teams
There you have it! For more information on planning Microsoft Teams Live Events, watch our on-demand webinar, Live Events in Microsoft Teams Made Easy.
